Koha How-To
Koha Question of the Week: How Can Notices be Edited in Koha?
 by Kelly McElligott on Dec 30, 2022
Each Friday, we will bring you a new Koha Question of the Week. We will select real questions that we receive and share the answers with you!
Question: How Can Notices be Edited in Koha?
Answer: Both the text and content of each Notice and Slip generated in Koha can be edited and customized to fit the library and branch.
Within the Tools module, the Notices and Slips are where all the notices are contained.
From here, each notice/slip that is sent by Koha will be listed in this table. There is a code and a description to assist the library to find which notice to edit.
Here are some helpful documents that can assist in finding the right notice and what should be contained in each one.
Existing Notices found in Koha- Manual
Notices and Slips Library-Koha Wiki
Customizing Notices and Slips- Koha Wiki
Helpful PDF for Customizing Notices and Slips
An Editing Example
1. Go to Koha staff interface
2. Click on Tools
3. Click on Notices and slips
4. Choose the Notice to Edit

5. Click on which Notice by Transport Type: Print/Email/SMS/Phone
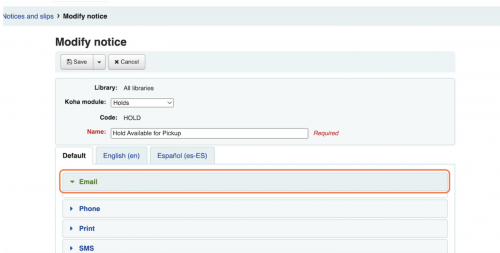
7. Click on content
Make the edits necessary. This can include adding/editing/removing information from the text box on the right or including more information from the Options on the left.

If using pre-defined information from the left, click on the text you want to use, and then use the insert button to have it placed within the notice.
8. Save
Additional Resources
Want to add a "Cost Savings" to your patron's checkout slip?
Find out how in this blog post!
Show Library Cost Savings on your Koha Receipt
Also, here is a Monday Minute tutorial video where we break down altering the Issue Slip to include additional content from the News area in Koha.
Monday Minutes: Customizing Your Issue Slip
Also, a full blog post dedicated to Notices and Slips including a tutorial video can be found here:
New Director: Notices and Slips
Read more by Kelly McElligott