Aspen Discovery
Materials Requests in Aspen Discovery
 by Morgan Daigneault on Feb 17, 2022
Materials Requests in Aspen Discovery
Last week we learned about Aspen’s options for enabling materials requests or purchase suggestions. These all work seamlessly within the interface via a form connected to your ILS or by connecting them to an external link. However, if your ILS doesn’t include a materials request module or you’re looking to upgrade from the Google Form life, Aspen’s own built-in purchase request module might work for you!
Before You Begin
If you have multiple libraries within Aspen that have unique scoped catalogs, each library can set up their own versions of the materials request module with their desired form fields, requestable formats, and statuses. However, this means that permissions for the materials request module are ultimately tied to the admin user’s Home Library.
Any administrative user with the permission to access Library Systems settings will be able to perform the initial setup for Materials Requests, but a user will only be able to see the accompanying Materials Request module if their home library matches the Library System for which they’re setting up materials requests.
The admin user will also need the library_material_requests role assigned to them. If you no longer have this role, you can create a new role or add permissions to an existing role. In the list of permissions, you’ll need to make sure the top three permissions under Materials Requests are selected.
Getting Started
To begin setting up Aspen’s materials request system, you’ll start in Primary Configuration > Library Systems. Edit the appropriate library system setting, then scroll down to the Materials Request section. This is where you will enable the Materials Request module, which will appear as its own section within Aspen Administration. You will also configure the initial setup for the Materials Request form that patrons fill out, and specify which formats can be requested.
Select the Aspen Request System from the first dropdown. While you’re still in the configuration stage, you may want to uncheck Turn on Materials Request for Public.
While this is unchecked, patrons will not be able to access a link to the materials request form from within their accounts or at the bottom of search results. However, you can still get to the form directly by adding /MaterialsRequest/NewRequest to the end of your main catalog URL. This way you can still access the form in order to submit test requests. When you’re ready to go live with the Aspen request system, return to these settings and check Turn on Materials Request for Public to enable.
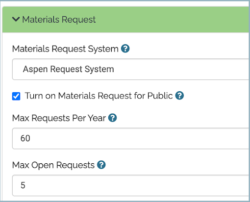
Next, you’ll specify the Max Requests Per Year and Max Open Requests. The default is 60 per year and 5 requests open at a time, but you can input whatever works best for your library.
In the New Request Summary text editor, you can specify any message you’d like to appear above the request form. Some libraries choose to clarify what can or can’t be requested, how old an item has to be before requesting, etc.
For Delete Closed Requests Older Than (days), specify the number of days closed requests should remain accessible in the system. If left at 0, all closed requests will be preserved indefinitely.
In the next section, you’ll get to specify the fields that display within the Manage Requests screen. Leaving this blank will automatically populate the management screen with default fields, but you can click Add New here to configure your screen from scratch.
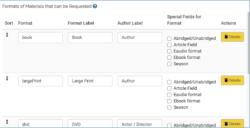
Under Formats of Materials that can be Requested, you’ll specify the formats you want patrons to be able to request on your form. Click Set Materials Request Formats to Default to automatically load in a default set of formats. From here, you can edit or delete any of these fields and continue to add new formats if desired. Under the Format column, if you add any new formats that aren’t listed, make sure the value there is in all lowercase with no spaces. Under the Special Fields for Format column, you can select whether the form asks for additional information if they’ve selected that format for their request.
In the following section, Materials Request Form Fields, you can specify the fields to appear on the form your patrons will complete for their requests. Once again, click Set Materials Request Form Structure to Default to auto-populate with default settings. To see what the form looks like, save your changes and use the direct form URL mentioned above. This way you can see how the form is organized and make your changes accordingly.
The Form Category column corresponds to different section headings on the form. The Field Label is the text label for the field, and Field Type specifies the type of information required for the field.


Once you have these settings in place and have saved your changes, you’re ready to head over to the Materials Request module!
Manage Statuses
Under the Materials Request module within Aspen Administration, click Manage Statuses.
If setting up for the first time, this page will be blank. At the bottom of the screen, click Reset to Default to load in all of the available default statuses. You can also delete unwanted statuses or add in your own. These statuses will show within the Manage Requests screen and will display to the patron as well, depending on the status you’ve set for the request or actions taken by the patron. In order for materials requests to work, at least one status here must be defined as the default.
You can change which status is the default by editing that status and checking Default Status? to enable. You also have other options when editing a status, such as whether to switch to that status if a patron cancels, or whether changing to this status sends an email to the patron. If emailing the patron, you can specify the email to send in the Email Template text field.

Managing Requests
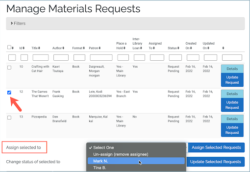
Under the Materials Request module, click Manage Requests to see submissions.
To assign requests to specific users, click the checkbox to the left of the request and select a staff member from the dropdown list, then click Assign Selected Requests. Similarly, you can update one or more requests with a new status using Change Status of Selected To and selecting the status from the dropdown.
Click Details next to a request to see the complete details for a request. You can also click Update Request to edit or add information to a patron’s request.
When dealing with many requests, quickly search for a specific request by using the blank filter boxes to search for information in a specific column. Click Filters for even more options for filtering through requests.

Reports
Access a summary report of all requests by clicking Summary Report in the Materials Request module. You can specify a date range for the report and see how many requests were created and how many are still pending from the specific time period.
You can also access numbers for individual users in the Report By User section. See an overview of users with pending requests, filter user requests by specific statuses with Filters, or export the data to Excel.
Ready for Your Patrons
Once you’re ready to go live with your materials request form, return to the Library System settings, navigate to the Materials Request section, and make sure that Turn on Materials Request for Public is checked on. Now your patrons will be able to access the link to the form at the bottom of search results and from within their account.

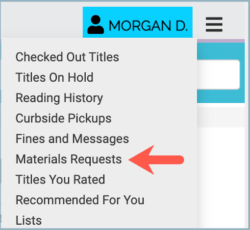
When users visit the Materials Requests section of their account, they’ll have a button to submit a new request along with a summary of their materials requests. They will be able to filter by only open requests or all requests. The user can see the full details of their request, the status of their request, or cancel if desired.
We hope you’ve enjoyed learning about your options in Aspen for managing materials requests. If you have questions, please reach out to us via the Slack channel or submit a support ticket. We’re happy to help!
Read more by Morgan Daigneault