 by Morgan Daigneault on Jul 15, 2021
With the Menu Links settings in Aspen, it’s easy to make sure patrons have ready access to your resources. We love seeing the unique ways our partners use menu links to make their sites even better. Before we discuss how to customize your own menu links, check out some of these examples for inspiration!
Carnegie Stout Public Library just went live this week, and their Aspen catalog looks great! We love how they added a “Can’t Find It?” category of links to their hamburger menu. This category collapses and expands when users click the arrow next to the display text.

Arlington Public Library has kept their top menu sleek and simple, opting to utilize the hamburger menu for additional links as well. They’ve added a few useful links to help patrons find what they’re looking for, leave feedback or report account issues, and read tips and tricks for searching in the Aspen Discovery catalog.

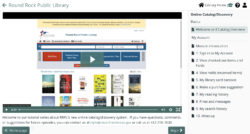
Round Rock Public Library has made great use of links in their top menu, with free FontAwesome icons to draw users’ attention. “Lists” links directly to the search results of all public lists, making it easy for their patrons to find staff lists for easy readers advisory. They also have convenient links for advanced searches and paying fines. Best of all, the “Tutorial” link takes patrons to a customized series of tutorials to help patrons learn how to navigate their user accounts!

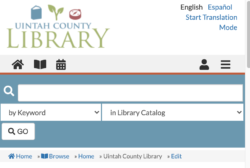
Uintah County Library has some great top-menu link categories, several of which open nested links listing more specific options. With just a few clicks, patrons can see many of Uintah’s programs, services, and resources!

Creating Menu Links
Now that we’ve seen some great examples from our library partners, let’s explore how we can customize menu links. Head to Aspen Administration -> Primary Configuration -> Library Systems. Click into the library system setting you’d like to create menu links for and scroll down to the Menu Links section. Clicking “Add New” will populate empty link fields where your link information will go.
Single Link or Nested Links?
To create a single menu link, give the link a name in the “Category” field. You’ll use this same name in the “Link Text” field. To include an icon next to your link, visit the FontAwesome URL and paste the icon name in that column. Then specify a URL for your link. Tip: if you’re linking to a page created with Web Builder, you can simply use the URL alias (“/help”).


To create a set of nested links, you’ll first decide the name of the menu Category. This is the text that will become the header of your menu. You’ll create one link entry for each link in your menu. In this example, the Category is “Education,” and the Link Text fields contain “Articles,” “Videos,” and “Admin videos.”

Top Menu or Hamburger Menu?
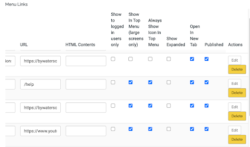
Within the Menu Links section, use the scroll bar to see additional options for your links. Checking “Show In Top Menu” will put the link in the top menu. Leaving it unchecked will send the link to the hamburger menu.

Note: when creating a nested link category for the top menu, be sure to check “Show in Top Menu” for all of the links nested within that category. Leave these boxes unchecked if you wish to create a nested link category for the hamburger menu.
Other Options
When “Always Show Icon in Top Menu” is checked, this means that the icon will remain in the top menu even if the window size changes (ie, for mobile view). As you can see, Uintah has specified that only certain icons remain visible in their top menu so that the most essential links are still available. The other top menu links don’t completely disappear when in this minimized view -- if the “Always Show” option isn’t checked, they will pop over to the hamburger menu.
When creating nested links for the hamburger menu, checking the “Show Expanded” boxes will automatically show the nested links within that category.
Otherwise, the links will stay minimized, and users must click the category title to see the nested links.
Finally, to hide a menu link without deleting it entirely, uncheck the “Published” box. If you want to completely remove the link(s), click the Delete button.
The "Home" Icon
By default, Aspen sites are loaded with a single icon of a house on the left side of the top menu. But as with most things in Aspen, the icon and the link can be customized! From the admin settings, head to Layout Settings under Theme & Layout. Here you can choose whether the icon appears as a house or a book. The icon automatically links to the main page of your catalog, but you can choose to instead have the icon link to your library’s external website -- whatever you have specified as the Home Link within your Library System settings. You can change the link behavior for the home icon, logo, or the breadcrumb link text.


We hope this helps you to see some of the many options there are when it comes to creating and expanding your menus and links. If you have questions about layout or customization of menu links please reach out!
Read more by Morgan Daigneault