Koha Tutorial Videos
Deep Dive : Experience the Koha to Koha ILL Module
 by Kelly McElligott on Feb 1, 2022
Kelly and Jessie walk through the steps of using the Koha to Koha ILL module. This is a great addition to the Koha ILS software and will be very instrumental for neighboring Koha Libraries to start lending with each other. As with all modules in Koha, this is a free option and can be installed into your library's existing Koha system. This has been broken into two video tutorials, one dedicated to the setup for the Administrative and one for the workflow for the library circulation staff.
Tutorial for Setup
Tutorial for ILL Workflow
Plugin
Our first step in installing this module into your Koha system is to have the Koha to Koha ILL plugin installed into your system. This is currently something that ByWater Support can do for you- so if you are a partner, please submit a ticket. Further documentation for libraries using Koha without ByWater Support, see this wiki page.
Once the plugin has been installed onto your Koha installation, the next step is configuring the plugin.
Plugins are found under the Administration Module- Under Plugins.
Find the Koha to Koha ILL plugin listed in the list of plugins currently installed on your site and under the actions options- Configure.
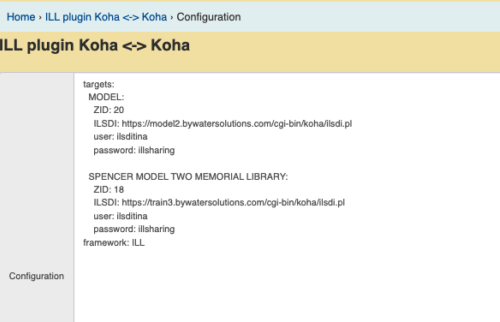
As illustrated above in this screenshot, this would be an example of how the details of what the ILL Plugin needs to be configured.
targets: under this, a library would include all the libraries they would like to connect to via the ILL module.
MODEL2: this is the library name specific to how it is displayed in the z39.50 directory
ZID: 17 this is the z39.50 number that Koha has created when this target was added to your site. An easy way to find this number is to look at the URL when you are in the target or hover with your mouse over the target name.
ILSDI: this is the direct link to the URL of the library, not the staff client link, there also needs to be an additional bit added to the end:
/cgi-bin/koha/ilsdi.pl
so, for example, https://model2.bywatersolution...
user: a library will need to create a System Account for this ILL module. This is that system account's user name and then the password.
password:
framework: ILL This is the code of the Framework that the library would like their items to be created within the system.
Video Tutorial on Editing Frameworks in Koha
Note: This spacing above is not accurate. Please refer to the image for correct spacing or reach out to ByWater Support for assistance. With multiple targets, we are only going to use targets: in the beginning. This is an array. The framework code should also only be in this configuration one time.
Patron Category
For this ILL process, a library will need to create a new Patron Category with the code , ILLLIBS
The library will also create a patron for the System Account to use (this is the patron that is mentioned above- so note the user name and password).
Any libraries that you will be using the ILL module with, will need to be created in this patron category using the same patron category.
System Preferences
There are some related system preferences that we need to enable to start using the ILL module.
CirculateILL-Enable/Disable the circulation of ILL requested Materials
ILLCheckAvailability- Check/Don’t Check external sources for availability during the request process
Note: If you have enabled the ILLCheckAvailability system preference and install plugins for the staff interface you will be presented with search results. The user can click on a link to a relevant resource if found or proceed with the ILL request. If no results are found the ILL is completed in the usual way.
ILLDefaultStaffEmail
Fallback email address for staff ILL notices to be sent to in the absence of a library address: ___ .
By default replies to ILL request emails will go to the library email address, if you would like to specify a different email address you can do that here.
ILLHiddenRequestStatuses
ILL statuses that are considered finished and should not be displayed in the ILL module: ___ (separated with |). If left empty, all ILL requests will be displayed.
This preference allows libraries to hide requests from the View ILL requests list based on the status of the request. Available ILL statuses are configured in the ILLSTATUS authorized value category.
Koha has these built-in statuses:
REQ= Requested
GENREG= Requested from Partner Library
COMP=Completed Request
RET=Returned to the Library
ILLModule- Turn on/off this module (master switch)
ILLModuleUnmediated- Enable/Disable unmediated interlibrary loan requests. If enabled and the ILL backend supports it, the newly created requests are immediately requested by backend.
ILLOPACbackends Enabled ILLbackends for OPAC
ILLSendStaffNotices- Send these ILL notices to staff when appropriate.
Send these ILL notices to staff when appropriate: ___ (separated with |). e.g. ILL_REQUEST_CANCEL|ILL_REQUEST_MODIFIED If left empty, no staff ILL notices will be sent.
A library can configure which ILL notices should be sent to staff.
Steps for Workflow
Now that we have configured the ILL module, we can successfully submit a request to another partner ILL library. First and foremost, your library will have a new button for Koha ILL to ILL on your staff interface.
Within the ILL module, you will create a new ILL request
- New Ill Request can be searched by:
Keyword
User Name
- Then we enter the borrower details
The card number of the patron making the request
Pick up Branch
Koha will display all options and what location the item is at. If your library has multiple z39.50 targets open for ILL, you could see all options. Pick the item that you would like to request.
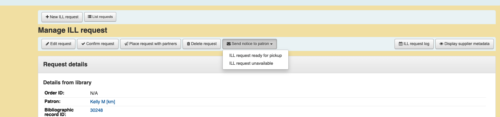
Let's first talk about the tabs across the top, once this request has been picked.
Edit- if you find you need to make any changes to this request.
Confirm Request- we will talk about that further down- this is going to do most of the work!
Place Request with Partners- If your library has not set up the ISLDI option, this will send an email to the library requesting the material.
Delete Request- delete the request
Send Notice to Patron- there are two options here- send a notice directly to the patron telling them it is ready to pick up or sending notice directly to the patron that it is unavailable.
Notices: ILL_PARTNER_REQ
ILL_PICKUP_READY
ILL_REQUEST_UNAVAIL
ILL Request Log- shows all the changes to this ILL request
Display Supplier Metadata - gives the title, author, Biblio number on the partner's site and the library you are requesting it from. All this data does live in the Manage ILL request page.
Confirm Request
When clicking "Confirm Request", Koha will
- Builds stub record in the requesting Library
- Also creates a hold on the Partner Library’s Record
When the item arrives from the partner library, within this Request, there will now be a "Check out" button.
-Clicking Checkout will create the item on the stub record that was created when confirming the request. To create the item, Koha needs to know- what item type should it use for this item and also if a specified due date should be assigned. If no due date is entered, Koha will follow the Circulation Rule for this Item Type and Patron Category that it will get checked out to.
When the item gets returned back to the library, the Request can be marked Complete. Marking a request complete will change the status of the Request to "Returned to Library"
View ILL Requests
All ILL requests will live in the table, View ILL Requests. There is a filter on the left-hand side that can allow staff to search for a specific keyword, status, date, library, and patron.
On the far right of the table, there is an option to Manage Request. This will bring the user to that specific ILL request to finish up a process, send an email, or make any edits.
Read more by Kelly McElligott