Libki Kiosk Management
Managing Users in Libki
 by Kyle Hall on Feb 17, 2021
This Libki tutorial will walk you through managing users.
Managing Users in Libki
Login to the Administration view of Libki.
Once you're logged in, navigate to the Users tab.
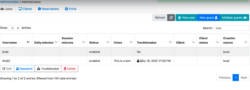
The Users tab will show you a list of all users in your system. These are typically represented by library card numbers. You may also see staff name logins and guest registrations if you issue guest passes.
The Users section is completely sortable and searchable. You can sort by any column to adjust the order. In the search box, the search results display any portion of a user name and does not have to be exact match. For example, a search for "smi" would return all users with the words "smi" in the name. So, "smittey, smith100, smithjohn" would all be returned.
If you use the Refresh button on the top, it will show you any up to date changes.
To create a single guest, you can hit New Guest. If you are trying to print a batch of guest passes, you can click on Multiple Guests and select how many passes to create and confirm how many minutes each pass allows computer access for.
When you click on New User, you can create a username, a password, and confirm the amount of minutes the user is allowed. If the username is already taken, it will automatically let you know and prompt you to create a unique username.
Once you've created a new user, they will show up in your User list. To make changes to the user, you can simply hover over the user and the options Edit, Password, Troublemaker, and Delete will show.
To delete a user, click Delete and a box will prompt you to confirm deletion.
You can also mark a user as Troublemaker. What that does is it prompts the user to be restricted for a period of time (x amount of days, months, years) that a library staff member sets. Library staff can also include notes here to inform other library staff of the situation. For historical purposes, the note will be retained as a part of the User record unless it is manually deleted by a staff member. The Troublemaker function was born out of some libraries requesting ways to enforce their computer usage policies. For example, if an account has been compromised (exp: someone using multiple card numbers to sign in and increase their daily access limits) or if a patron has been asked to leave (exp: restrict the card for a day for a behavior issue). This is up to each library and their policies if you would like to use this feature.
When you click on Password, you can quickly update the password for the user. This is a shortcut from hovering over the user record, and clicking on Edit, where you can also change the user password.
When you click on Edit, you can see the entire user record. This includes Details and Roles. Roles offers two options- Administrator and Super Administrator. By default, these will be unchecked for the regular front end user. You would want to adjust these roles for library staff. The only difference between the two, is that the Super Administrator is allowed to make changes to Libki Settings.
We hope you enjoyed learning more about how to easily manage users in Libki!
About Libki
Libki is a cross-platform pc reservation booking and time management system designed to allow time limited access to computers on a network. Libki is ideally suited for use in locations where a controlled computing environment is paramount such as public access systems, libraries, school computer laboratories and more! It consists of two parts, the Libki server, and the Libki client. Visit the Libki site to learn more.
Read more by Kyle Hall